Introduction to Adobe Aero 2023
•
0 gostou•18 visualizações

This file is a handout used for a training in getting started with Adobe Aero at a university.
![2
The Training Session:
How to Get the Most out of the Aero Training
Pre-Training
Go online and review some of the augmented reality (AR) creations made using the Aero app. Sample broadly, so you
see AR for art, for industrial applications, for design, for teaching and learning, and anything else that may be available.
Consider how AR scenarios and experiences may be useful for your work context.
During Training
There are already some notes made here. There is other documentation.
Jot down a few ideas of tool features that you may want to use directly.
Be ready to ask questions as they arise during the session.
Post-Training
Download a copy of Adobe Aero if you have an Adobe Creative Cloud license at K-State.
Conceptualize a simple AR scene and begin your practice. Or just open the app and explore it using Starter assets.
Hour 1: Introduction of Augmented Reality
• What is augmented reality (AR)?
• What is AR like as expressed through mobile devices?
• Why is AR considered something of a new field? What has been defined? What has yet to be more fully
defined?
• What are some common AR examples used for various objectives?
• Why are AR objects necessarily lightweight? (the polygon counts low, etc.) The motions fairly simple? Why is
the computation fairly demanding for the AR to spawn and project? Why is wireless connectivity (cell service,
others) so important for AR to function?
• What are some common objects that may be used to seed AR (stills, videos, animations, and so on)
• What are some technical features of AR with 2d, 3d, and 4d?
• How is AR used for teaching and learning?
Hour 2: Introduction of the Adobe Aero App
• What is Adobe Aero?
• How is Aero different between the Windows desktop version and the iOS iPad one?
• Why do Adobe Aero files get saved to the Adobe Creative Cloud? [Adobe Creative Cloud -> Cloud -> Cloud
Documents]
• Other questions](data:image/gif;base64,R0lGODlhAQABAIAAAAAAAP///yH5BAEAAAAALAAAAAABAAEAAAIBRAA7)
Recomendados
Recomendados
Mais conteúdo relacionado
Semelhante a Introduction to Adobe Aero 2023
Semelhante a Introduction to Adobe Aero 2023 (20)
Mais de Shalin Hai-Jew
Mais de Shalin Hai-Jew (20)
Último
Último (20)
Introduction to Adobe Aero 2023
- 1. 1 Introduction to Adobe Aero 2023
- 2. 2 The Training Session: How to Get the Most out of the Aero Training Pre-Training Go online and review some of the augmented reality (AR) creations made using the Aero app. Sample broadly, so you see AR for art, for industrial applications, for design, for teaching and learning, and anything else that may be available. Consider how AR scenarios and experiences may be useful for your work context. During Training There are already some notes made here. There is other documentation. Jot down a few ideas of tool features that you may want to use directly. Be ready to ask questions as they arise during the session. Post-Training Download a copy of Adobe Aero if you have an Adobe Creative Cloud license at K-State. Conceptualize a simple AR scene and begin your practice. Or just open the app and explore it using Starter assets. Hour 1: Introduction of Augmented Reality • What is augmented reality (AR)? • What is AR like as expressed through mobile devices? • Why is AR considered something of a new field? What has been defined? What has yet to be more fully defined? • What are some common AR examples used for various objectives? • Why are AR objects necessarily lightweight? (the polygon counts low, etc.) The motions fairly simple? Why is the computation fairly demanding for the AR to spawn and project? Why is wireless connectivity (cell service, others) so important for AR to function? • What are some common objects that may be used to seed AR (stills, videos, animations, and so on) • What are some technical features of AR with 2d, 3d, and 4d? • How is AR used for teaching and learning? Hour 2: Introduction of the Adobe Aero App • What is Adobe Aero? • How is Aero different between the Windows desktop version and the iOS iPad one? • Why do Adobe Aero files get saved to the Adobe Creative Cloud? [Adobe Creative Cloud -> Cloud -> Cloud Documents] • Other questions
- 3. 3 What is…? Augmented reality, basically, is the application of a digital overlay of visual (and sound, and motion, and interactivity, in many cases) over a physical space…for various purposes. The objects may be 2d (x and y axes on a flat plane) or 3d (x and y and z axes in volumetric space) and / or 4d (objects with motion or changes over time). Various File Types Usable in Adobe Aero: The following table shows some files that may be ingested and exported into and out of Adobe Aero. Import (still images and video) Export The colors for AR seem to be optimized in RGB or screen mode. Still images for Aero: .png (raster) .svg (vector) .psd (Photoshop document, for editable layers to enable objects to be “set back” in visual space) .jpg / .jpeg (raster, lightweight, lossy) .tif / .tiff .gif (animated .gif for animated sequences) and others 3d objects: .obj (3d geometries) .glb (“3D scenes, models, lighting, materials, node hierarchy and animations”) (“What is a GLB file?..., Visao) / GL Transmission Format Binary (GLB) (standardized format) .fbx (3d model file) (“Filmbox” format by Autodesk) (proprietary format) Importing animated characters: There are four ways to import animated characters into Aero: From Aero: .real format (for use in Adobe Aero viewer platforms only) Can be shared via http link or QR code (among others)
- 4. 4 1) Glb or fdx with animations already applied 2) Character as glb or fdx and multiple animations included in the export 3) Scripted animations in fdx to apply to characters already in the Aero scene 4) Multiple animations in fdx to apply (skeletons must match) and others When building 3d objects for use in the AR space, it makes sense to set the proper scale of the image to the scene that it will be used it. Re-scaling in Aero is possible, but it may change the visual quality of the object in scene depending on the pixels and / or polygons and textures. Thinking about the Constrained Visual Field It may help to think about the constrained visual field as follows. There is the focal vision in the light crème colored area…To the left and the right of that area is peripheral vision, which is less focused and less precise. Above the vision line may be objects or other effects; likewise, below the vision line may be objects or other AR effects. The user will have to move the mobile device in order to look up, down, left, and right. An AR visual may just be designed in the focal vision area if desired. The AR does not have to be immersive. The important or central parts of the AR experience should be in the foreground and should be centered in the field of view. Peripheral materials may be supporting experiences, if the periphery is used at all.
- 5. 5 Another way to think about the space is where the user is, and what is near-space, middle-space, and far-space. For interaction with AR objects, it helps for the user to be close in to the visual. A foot (12 inches) is 30.48 centimeters…and that is considered fairly close in. When a person is engaging an AR object, something a few feet out may well be far- space in the mobile AR. What behavior is expected as input (like pushing a button, like approaching in terms of proximity), and what behavior is output by the AR object (some motion, new spawning, sound, or something else, or some combination of outputs)? Designing and planning for I/O is important. An experience may be designed onto a path or a full room. In such cases, it is helpful to have guiding arrows and /or lighted paths to show how to proceed. Or the space may be purely exploratory for users to go to what they want when they want. The physical space should be safe and accessible for all. Experiential Design…in Time A simple experiential design approach may consider the initial experience (entry) and the final end experience (exit) in terms of visuals, audio, tactual, olfactory, and taste sensory inputs (as relevant). More complex ones may include multiple experiences and paths through. Regardless, human subjectivities will make even a simple AR polysemous. Another design approach may be to describe the sequences of interactions of the individual through the AR experience. Remember that AR experiences tend to be short in order to avoid cybersickness. The immersions are not typically a long experience.
- 6. 6 AR in Teaching and Learning How AR can be used in teaching and learning varies depending on the discipline. AR (virtual overlays over real space) is thought to augment learning by enabling the following and more: • the depiction of imaginary worlds, • illustrating of hypotheses, • nano-scale into something human-experience-able, • the internals of an atom, the internals of a mammalian body, • macro-scale into something human-experience-able, • geographical place-based learning, • interior or indoor experiences, • exterior or outdoor experiences, • repeatable learning experiences, • repeatable and escalating training experiences, • the deployment of scripted learning agents (‘bot tutors), • social learning experiences (both physical and tele-presence), • collaborative experiences, • design experiences, • assessed learning, • a multi-sensory full-surround (for inspiration, for example; for cultural immersion), • and others. The research literature suggests that AR does require extra cognitive load (working memory). The research also suggests some benefits to learners in some cases but not in others. Even though AR has been around for many decades based on early industrial uses, its adoption in education has been somewhat limited. A Simplified Work Pipeline for Mobile AR for Teaching and Learning In terms of teaching and learning, there is a general sequence that may be followed for the designing of mobile AR. In AR design, there is “bodystorming” and “programming by demonstration” in which people may physically act out the scenario…the interactivity…about how that imaginary AR space could work…as a way to broaden the possibilities of what may be created. The idea is to externalize the thinking in a way that the design team may consider. There is a focus on conceptualizing and re-conceptualizing what is possible first in order to take in a diversity of ideas…to inform choices…and to inform the design work later on. It is much less costly to think through possibilities than to build out concepts into a refined state before deciding on a direction.
- 7. 7 Note that the design may include pedagogy (for learning), scenario design, character design (if used), motion design, interaction design, and other factors. These are particular design areas in augmented reality (and extended reality or “XR”). The conventions of the fields may benefit the AR design. It helps to know the conventions without being slowed or stopped by them. A consensus stylebook helps the team understand what the core base technologies and quality standards are. It helps them understand the look-and-feel and color palette. It helps them understand laws related to intellectual property, privacy protections, accessibility, and other requirements. And it helps smooth the work interactions, so that the team may be productive and constructive. A consensus stylebook takes in inputs from all the team members, and it is an evolving file, so that new learning may be integrated. The prototyping (low-fidelity usually) and pilot testing phases are pre-development. They enable a more sensorily and technologically informed view of the AR. Through each phase, contemporaneous notes should be taken and included. This helps with team memory and awareness of decision junctures and decisions made. The flowchart above captures only some of the complexities of a build-out for teaching and learning using AR. The technologies for making 3d visuals in sparse polygons all have their own quirks, and making sure that the works function in terms of look-and-feel, motion, and interactivity is not simple.
- 8. 8 3d in x, y, and z axes instead of 2d Pretending to be 3d Many digital image creation and editing software tools create an illusion of 3d, but the objects export only as 2d (even those that export directly to Adobe Aero). There are a variety of tools that people use to build out in 3d, some for free and others at cost. Imagine 3d objects for AR as shapes (made with volumed polygons), skeletons (with joints or areas where an object may bend), and scripted behaviors (movement, motion, facial expressions, and others). Importing Objects and Placement Inserted 3d and 2d objects in the world are placed in 0,0,0 (x, y, z) or the “center” of the world. They can be moved from that location. It is better to have that space empty so that objects do not spawn into other objects, for example.
- 9. 9 Mobile AR There are a number of AR tools and systems, but the one being explored here is a fairly powerful one but limited to mobile AR. While other types of augmented reality enable “embodied” learning, this tool requires use of a mobile device and the experience through a small screen. This means that there are built-in constraints. The visual field is small, and the delivery is not stereoscopic in terms of fidelity. The sound is not binaural (so not communicating whether a sound is coming from in front of or in back of the individual). AR has a lot of capability, but this tool apparently provides a lightweight version. Building Lightweight In general, because of the reliance on wireless fidelity (wifi), such scenes have to be very lightweight, or they will be too big to function. Very heavy AR may instantiate not “all at once” but in parts and pieces, potentially harming the intended experience. “Less is more” seems to apply to the building context. As wireless advances and larger loads can be handled, this issue may change (but not in the short-term). Recording Video of the Augmented Reality Scene On the iPad, videos may be made on the Aero app of the AR. (See the screenshot from one such video to the right.)
- 10. 10 Adobe Aero for AR Adobe Aero has built-in “starter” resources that include 3d objects, animated objects, directable characters, and text, among others. The abstract shapes are not “prims” (primitives) per se, but they enable some “early wins” in building out something from nothing. One can filter by “models” (the 3d cube shape) or images (the image icon). The icons turn blue when they are on. Just click again to turn them off. (See the “Filter by” in the screenshot visual to the left.) The objects are lightweight polygons. The animated ones have built-in scripting for certain motions. The directable characters are jointed “actors” who may have motions assigned to them (walking, running, dancing, and others). (See the visual to the right.) Layered flat illustrations may also be input from the “starter” resources. (See the visual to the left.) Editing Images in a 3D Image Editing Tool or Game Engine If there is a particular look-and-feel that one is going for, with a particular color palette, it would be a good idea to have the 2d and 3d objects properly styled before importing into Aero. Aero itself does not appear to enable much re-editing in the software. Pre-processing can be important to the success of the AR experience. Inherited 3d objects may be edited in 3d editing software programs depending on the digital file type. (There are universal formats vs. proprietary ones. The prior set enable more control over the 3d objects.) It is wise to explore the features of inherited 3d objects. These can present differently in different tools, and some aspects may not transfer well between software programs. Alpha Testing and Beta Testing An “alpha” (α) test refers to assessing the created AR objects based on standards:
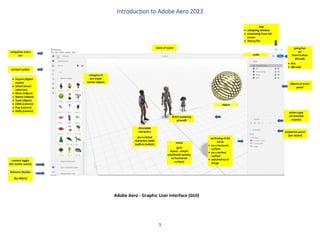
- 11. 11 • Legal (intellectual property, privacy infringements, and others) • Accessibility (Section 508, sufficient contrast, outlining of objects for ambient visibility, sound clarity, physical accessibility/safety, and others) • Functional (technical, transcoding, delivery, etc.) • And others A “beta” (β) test refers to the assessing of the AR experience with live learners to better understand their experience with the AR and to identify unmet needs. Visual Styling for a Scene How can one make sure that a scene looks of-a-piece? The (visual, auditory, tactual, olfactory, and other) elements in the scene, the color palette, the purposive design, and other aspects speak to the coherence of the AR experience. Essentially, building out in Aero involves adding 2d, 3d, and 4d (with motion) elements into the scene. One can add behaviors to each of the elements. Just click the object, then go to the Behavior Builder to open the window to add various actions and triggers. (See the Behavior Builder highlighted in a red rectangle in the visual to the left.) The basic triggers for actions / behaviors include the four main ones: 1. Start (initial spawning state) 2. Tap 3. Proximity Enter 4. Proximity Exit (usually stopping of the action) (Other mobile ARs enable input triggers such as tapping, swiping, dragging, dropping, long pressing, and such, that are typical to touch-screens. More complex AR systems may include body gestures and other computer camera inputs.) Behaviors (actions) may be selected from the dropdown menu. (See the visual to the right.)
- 12. 12 One can select the initial view based on panning and dollying (zooming). All the files are automatically saved to the Adobe Cloud in one’s own account. If one wants to share, one can output a QR code or a link. (See the screenshot to the left.) Projects may be saved offline as well. Files may be re-named in the cloud version by clicking on the vertical ellipses (three dots). ( See the visual to the right.) Over time, it becomes clearer how to create a centerpiece for the AR experience…when to add sound…when to add motion…and when to add interactivity. Each addition can contribute something to the experience and the potential learning. With motion, especially if there are multiple objects that may move, there should be thoughtful design. For example, when should an object display motion, and when should it stop? If there is continuing motion among several objects, how can they be aligned and syncopated? Augmented Reality Graphical User Interfaces (GUIs) The design of graphical user “interfaces” is also relevant, particularly for AR experiences that are not one-scene only but may involve variations and different paths and such options. Interfaces have to inform users how they are expected to interact and how they can engage (and what they should expect from the AR once they engage). Some designers will create metaphors through which the visual interfaces may be built. For example, if there is an AR experience of consumer spending, an ATM interface may be used to navigate to different parts of the AR experience.
- 13. 13 Aero does offer the placement of interactive buttons (touched through the screen) and textual directions in the AR. How intuitive augmented reality GUIs (graphical user interfaces) are in augmented reality is important but also not studied in any depth yet. There is a limit to the number of AR elements that may be feasibly placed for consumption on a small screen though (like an iPad screen using Adobe Aero or an Android phone using Adobe Aero Player). Future Proofing Work Possible? It does not seem possible to truly future-proof this work as the AR is hosted on a company-owned site and tied to a proprietary tool. The .real format is a proprietary one. The AR experience is achieved here through a smart phone or iPad. There does not seem to be a head-mounted or head-worn way to experience the visuals. But this tool is a widely accessible one, and it can serve as a bridge to AR. Additional Informational Resources “Some Ways to Conduct SoTL Research in Augmented Reality (AR) for Teaching and Learning” https://www.slideshare.net/ShalinHaiJew/some-ways-to-conduct-sotl-research-in-augmented-reality-ar-for-teaching- and-learning [“SoTL” stands for the Scholarship of Teaching and Learning.] “AR for Learning and Accessibility: Insights from a Systematic Review of the Literature and an Environmental Scan (with an Early AR Accessibility Checklist)” https://www.slideshare.net/ShalinHaiJew/augmented-reality-for-learning-and-accessibility “Getting Started with Augmented Reality (AR) in Online Teaching and Learning in Higher Education” https://www.slideshare.net/ShalinHaiJew/getting-started-with-augmented-reality-ar-in-online-teaching-and-learning-in- higher-education Some Videos about Adobe Aero “Designing an Augmented Reality Scene in Adobe Aero” https://youtu.be/fo8aG0vCY7k “Importing Character Animations | Getting to Know AR in Adobe Aero | Creative Cloud” https://youtu.be/XFel__UCFoA “Directable Characters | Getting to Know AR in Adobe Aero | Creative Cloud” https://youtu.be/Ly1sgllm6tc “Adding Actions: Create an Interactive AR Button | Getting to Know AR in Aero | Adobe Creative Cloud” https://youtu.be/DYBr54rdU1c “Adding Actions: Adding Motion to Objects | Getting to Know AR in Adobe Aero | Creative Cloud” https://youtu.be/uPh7lcg3Ivw
- 14. 14 URLs for Updated Adobe Photoshop Presentation Handout (in .docx and .pdf formats) Word: URL: http://www.k-state.edu/ID/IntroAdobeAeroHandout.docx PDF: URL: http://www.k-state.edu/ID/IntroAdobeAeroHandout.pdf Adobe Licenses at K-State: Please use the TDX Service Portal for more information. https://support.ksu.edu/TDClient/30/Portal/KB/ArticleDet?ID=64 Adobe Aero is part of the Adobe Creative Cloud suite of tools. Presenter Dr. Shalin Hai-Jew ITS – K-State Hale Library shalin@ksu.edu 785-532-5262 Created: May 2023 Caveat: This is a first draft. There is nothing quite like plenty of hands-on practice in order to learn a new software program. There are unique insights that may be gained in trying new things. This handout was created after some test walk-throughs, so some of this is about how something should work vs. how it actually does in the wild. This software program would benefit from the user’s extensive background in digital image editing, but there are additional KSAs (knowledge, skills, and abilities / attitudes) that would be helpful in the use of this tool as well. Accessibility Note: This handout has alt-text for the images in the MS Word version (and these are in the Adobe PDF version, too). Text in the visuals is set up to be fairly high-contrast. The headers and sub-headers are another accessibility element (in terms of seriation). Http links are all hyperlinked for navigability.